Seeing the Northern Lights dancing in the sky on a clear night is always a fascinating experience. And a sight that Northern Lights travellers would undoubtedly like to take home with them. In fact, it's not that difficult with the right photo equipment and a little know-how. Freeontour has some tips to help you get started.
Autumn and winter is one of the best times to observe the Northern Lights in northern Europe. This fascinating natural phenomenon attracts more and more travellers in the cold season every year – and rightly so. Although the aurora borealis can occasionally be seen in Scotland and has even been known to flicker across the Mediterranean sky, the best chance of seeing the Northern Lights is still in northern Europe, especially in Northern Norway and Swedish and Finnish Lapland.

The following applies: more often than not, the further south your own position is, the lower the glow in the north can be observed over the horizon. Incidentally, you will be able to observe the Northern Lights better on cold nights – not because it is brighter then, but because cold nights usually have a clear sky. And that is the basic requirement to see the mystical veils gliding through the sky, and therefore to take photos. But what is the best way to photograph the aurora borealis?

1. The right equipment for the Northern Lights
You need a camera with which you can set an exposure time of several seconds. A manual adjustment, often referred to as a “bulb”, would also work, but you will have to count the seconds yourself. The speed should be set to at least ISO 1600. However, the higher the speed, the more noise the photograph will have. So, a high-speed wide-angle lens of 28 mm or less with an aperture ratio of 1:2.8 is good, a speed of 1.2 or 1.4 is even better.

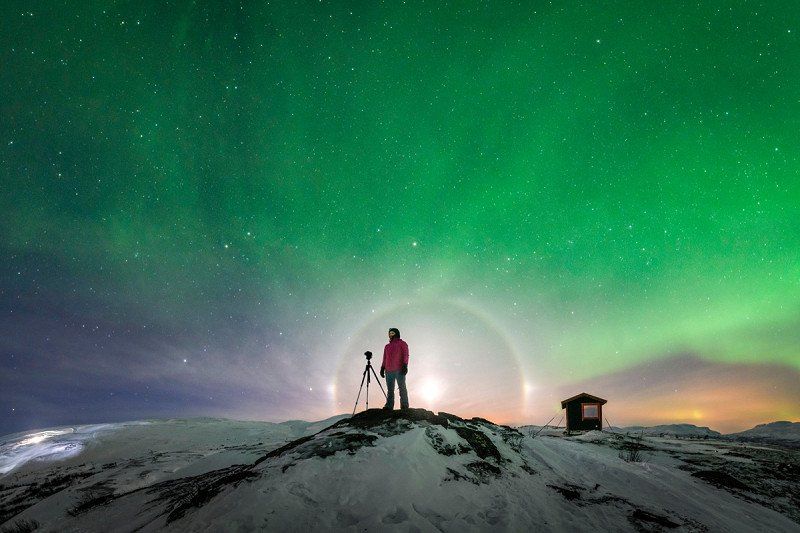
Since you have to work with longer exposure times, a stable tripod is a must, otherwise the images will be blurred. Incidentally, this is also the reason why you shouldn't simply press the shutter release, but instead either start shooting with a remote release or use the timer. The exposure length depends on several factors. If you have bright Northern Lights over you, it is worth trying four seconds and reducing the shutter speed by one step. If you can only see a faint glimmer of light, then the solution is to use ISO 3200 or 6400 and ten seconds and more of exposure. Don't forget to take a spare battery for the camera and a head torch as this means your hands can be free. Warm clothes, a hat and gloves are essential along with well-insulated boots as the cold usually creeps up from the ground through the body.

2. What is the best location for photographing the aurora borealis?
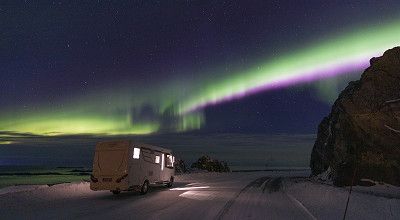
The best way to take beautiful photos of the Northern Lights is to be as far away from larger settlements as possible to avoid stray light. The photo will also have a greater impact when there is a reference point for the viewer, e.g. scattered farms in the background, a road with little traffic, a small forest, the sea or mountains. Photos that only show the sky tend to look boring. It is better to place the horizon in the lower part of the photo, therefore including the surroundings.
3. What to keep in mind when taking photos
You've found the right location and your tripod is stable, so you can now attach your camera to the tripod. Then turn off the autofocus and manually set the distance to infinity – on the distance scale opposite 8. Under no circumstances should you turn it as far as it will go as you risk blurring the image. Alternatively, you could work with the live display. You will then need to check the time and aperture settings, determine the appropriate image detail and press the remote release or timer. The image will appear on the display after a few seconds.

Is it too dark? Then extend the exposure time, e.g. from four to eight or even 16 seconds. Or you can increase the ISO value to 3200 or 6400. And should you still have some leeway with the aperture, open it wider. Is it too bright? Then reduce the exposure time or the ISO number. Another important tip: pack your ice-cold camera as airtight as possible before going back to your warm camper or hotel. Warm up the camera very slowly as otherwise condensation could form in the housing, which could damage the sensitive electronics.

4. Post-processing tips
You can enhance your Northern Lights photos even more on the computer. The right software especially can reduce the annoying noise. For the best results, capture and save images in JPG as well as RAW format as this keeps all options open for post-processing. Many camera menus will have the corresponding setting. Our conclusion: taking photos of the Northern Lights is not rocket science if you have the right equipment. However, you will still need the proper location, a clear sky and a good camera to take fascinating pictures. Not forgetting a little luck and a lot of patience.
Would you like to find out more about the aurora borealis? Freeontour recommends these locations for your Northern Lights trip: